

目次
Railsアプリケーションの作成
まずはRailsアプリケーションを作成します。Railsアプリケーションは次のコマンドで作成することができます。
rails new アプリケーション名
今回の例では「C:\ruby」配下に「hello_sample」というアプリケーションを作成しています。
PS C:\ruby> rails new hello_sample
      create
      create  README.md
      create  Rakefile
      create  .ruby-version
      create  config.ru
      create  .gitignore
      create  Gemfile
         run  git init from "."
Initialized empty Git repository in C:/ruby/hello_sample/.git/

・・・(省略)・・・

Done in 6.30s.
Webpacker successfully installed
コントローラーの作成
作成したアプリケーションに移動してジェネレーターコマンドでコントローラーを作成します。コントローラーは次のコマンドで作成することができます。
rails g controller [コントローラー名] [アクション名]
※アクション名は省略可
スポンサーリンク
今回の例では「hello」というコントローラーを作成しています。
PS C:\ruby\hello_sample> rails g controller hello
      create  app/controllers/hello_controller.rb
      invoke  erb
      create    app/views/hello
      invoke  test_unit
      create    test/controllers/hello_controller_test.rb
      invoke  helper
      create    app/helpers/hello_helper.rb
      invoke    test_unit
      invoke  assets
      invoke    scss
      create      app/assets/stylesheets/hello.scss
コントローラーにアクションを追加する
hello_sampleアプリケーションの配下に「app/controllers/hello_controller.rb」というコントローラーが作成されているので、コントローラーを次のように修正します。
class HelloController < ApplicationController
  def index
    @hello = "Hello World"
    render template: "hello/index"
  end
end
コントローラーの処理は、まずdefでアクション(メソッド)を作成。
def アクション名
処理内容
end
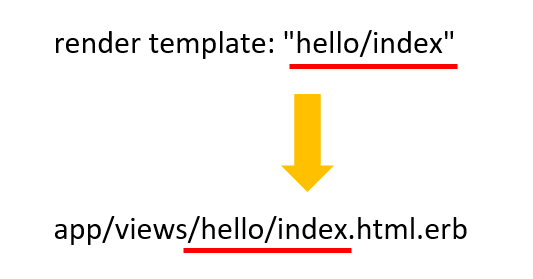
アクション内の処理内容は「@hello」というインスタンス変数に「Hello World」の文字列を設定し、「render template」では「hello/index」というビューを呼び出すよに定義しています。
@hello = "Hello World"
render template: "hello/index"
ビューを新規作成する
「app/views/hello」配下に「index.html.erb」というファイルを新規作成します。ファイル名は先ほどコントローラーで定義した「render template: "hello/index"」に一致させる必要があります。
新規作成した「index.html.erb」を次の通りに修正します。
<h1>Ruby on Railsで"Hello World"を作成する</h1>
<h2><%= @hello %></h2>
<%= %>で指定することでRubyコードの実行結果を出力することができます。また<% %>で囲むことでビューの中にRubyのコードを書くこともできます。
ルーティング情報の設定
最後にルーティング情報を設定します。ルーティング情報でユーザーからのリクエストを、どのコントローラーのアクションに割り振るかを決めることができます。
「config/routes.rb」を以下のように修正します。
Rails.application.routes.draw do
  # For details on the DSL available within this file, see https://guides.rubyonrails.org/routing.html
  get "hello", to: "hello#index"
end
スポンサーリンク
get "hello", to: "hello#index"
- get:HTTPリクエストメソッドの種類を指定(getやpost)
- "hello":ユーザーが指定するリクエストURL
- "hello#index":呼び出すコントローラーのアクション
上記のルーティング情報の設定により、ユーザーが「http://localhost:3000/hello」にアクセスすると「app/controllers/hello_controller.rb」コントローラー内のindexアクションが動き出すように紐づけられました。
Railsのアプリケーションサーバを起動
「rails s」コマンドを実行して、Railsのアプリケーションサーバを起動します。
PS C:\ruby\hello_sample> rails s
=> Booting Puma
=> Rails 6.0.3.2 application starting in development
=> Run `rails server --help` for more startup options
*** SIGUSR2 not implemented, signal based restart unavailable!
*** SIGUSR1 not implemented, signal based restart unavailable!
*** SIGHUP not implemented, signal based logs reopening unavailable!
Puma starting in single mode...
* Version 4.3.5 (ruby 2.7.1-p83), codename: Mysterious Traveller
* Min threads: 5, max threads: 5
* Environment: development
* Listening on tcp://[::1]:3000
* Listening on tcp://127.0.0.1:3000
Use Ctrl-C to stop
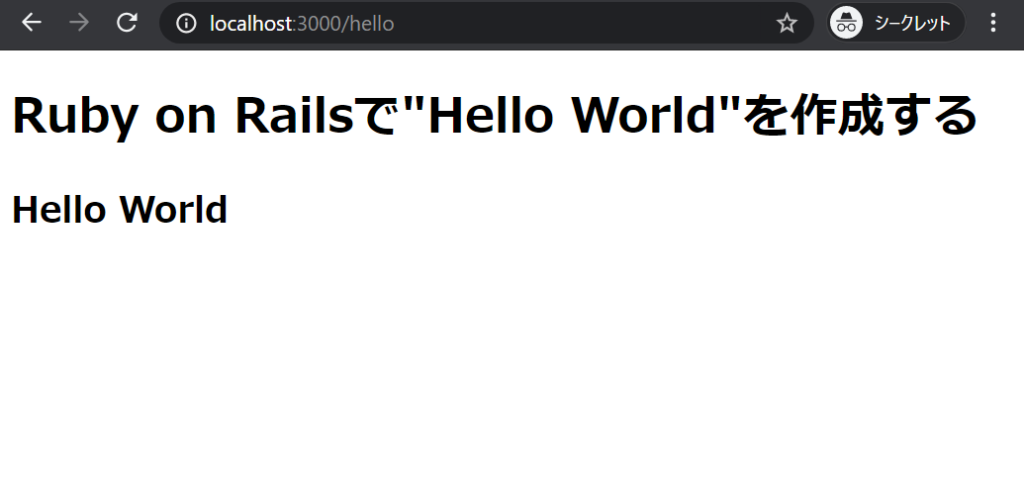
ブラウザで「http://localhost:3000/hello」にアクセスすると、以下のような画面が表示されます。

終わりに
本記事では「Ruby on Railsで”Hello World”を作成する」手順について紹介しました。
次回は、超便利機能である「Scaffold」でCRUDを作成する方法を紹介します。
- 準備編:Ruby on Railsの開発環境構築
- 入門編:Ruby on Railsで”Hello World”を作成する
- 基本編1:超便利ScaffoldでCRUDを作成する方法
- 基本編2:入力チェック(validates)の実装方法
- デザイン編1:RailsでBootstrapを導入する方法
- デザイン編2:RailsでAdminLTEを導入する方法
- 実践編1:Rails + AdminLTEで一覧画面を作成する
- 実践編2:Rails + AdminLTEで登録画面を作成する
- 実践編3:Rails + AdminLTEで編集画面を作成する
- 実践編4:Rails + AdminLTEで詳細画面を作成する