
目次
JPAとは
JPAとはJava Persistence APIの略で、以下の2つの機能をJavaのAPI仕様として定義したものです。
- リレーショナルデータベースで管理されているレコードを、Javaオブジェクトにマッピングする。
- マッピングされたJavaオブジェクトに対して行われた操作を、リレーショナルデータベースのレコードに反映する。
開発環境
開発環境
開発環境は以下の通り。
環境構築手順はこちら ⇒ EclipseでSpring Bootの環境構築 | 分かりやすく図解で説明
| 開発環境 | 名称 | 説明 |
| 開発言語 | Java | 人気の開発言語 |
| 開発ツール | Eclipse | Javaでの定番開発ツール |
| フレームワーク | Spring Boot | 人気のSpringフレームワークをベースとしたフレームワーク |
| テンプレートエンジン | Thymeleaf | Spring Bootと相性が良いテンプレートエンジン |
| データベース | MySQL | フリーで利用できる人気データベース |
ディレクトリ構成
ディレクトリ構成は以下の通り。
springSample
  |
  |___src.main.java
       |
       |___com.example.demo
       |    |
       |    |___controller
       |    |    |
       |    |    |__UserController.java
       |    |
       |    |___entity
       |    |    |
       |    |    |___User.java
       |    |
       |    |___repository
       |    |    |
       |    |    |___UserRepository.java
       |    |
       |    |___service
       |         |
       |         |___UserService.java
       |
       |___src.main.resources
            |
            |___templates
            |    |
            |    |___user
            |         |
            |         |___list.html
            |
            |___static
                 |
                 |___css
                      |
                      |___list.css
事前準備
データベース接続設定
プロジェクトにある「application.properties」を開き、MySQLの接続情報を設定します。
spring.datasource.url=jdbc:mysql://localhost/sampledb
spring.datasource.username=root
spring.datasource.password=password
spring.datasource.driver-class-name=com.mysql.cj.jdbc.Driver
build.gradleの依存関係
プロジェクトにある「build.gradle」を開き、使用する機能と依存関係の設定を行います。
dependencies {
  implementation 'org.springframework.boot:spring-boot-starter-data-jpa'
  implementation 'org.springframework.boot:spring-boot-starter-thymeleaf'
  implementation 'org.springframework.boot:spring-boot-starter-web'
  compileOnly 'org.projectlombok:lombok'
  runtimeOnly 'mysql:mysql-connector-java'
  annotationProcessor 'org.projectlombok:lombok'
  providedRuntime 'org.springframework.boot:spring-boot-starter-tomcat'
  testImplementation 'org.springframework.boot:spring-boot-starter-test'
}
データベースにテーブルとデータの登録
今回は以下のテーブルを作成します。
■ユーザー情報TBL
| 物理名 | 論理名 | データ型 | NOT NULL | 説明 |
| id | ID | BIGINT | 〇 | 主キー(AUTO_INCREMENT) |
| name | 名前 | VARCHAR(100) | 〇 | ユーザーの名前 |
| address | 住所 | VARCHAR(255) | ユーザーの住所 | |
| phone | 電話番号 | VARCHAR(50) | ユーザーの電話番号 | |
| update_date | 更新日時 | DATETIME | 〇 | 最終更新日時 |
| create_date | 作成日時 | DATETIME | 〇 | 登録日時 |
| delete_date | 削除日時 | DATETIME | 論理削除した日時 |
以下のCreate文でテーブルを作成します。
CREATE TABLE `sampledb`.`user` (
  `id` BIGINT NOT NULL AUTO_INCREMENT,
  `name` VARCHAR(100) NOT NULL,
  `address` VARCHAR(255) NULL,
  `phone` VARCHAR(50) NULL,
  `update_date` DATETIME NOT NULL,
  `create_date` DATETIME NOT NULL,
  `delete_date` DATETIME NULL,
  PRIMARY KEY (`id`));
以下のInsert文でテーブルにデータを登録します。
INSERT INTO `sampledb`.`user` (`id`, `name`, `address`, `phone`, `update_date`, `create_date`) VALUES ('1', 'テスト太郎', '東京都サンプル区1-1', '080-0000-0000', '2019-05-06 12:00:00', '2019-05-01 12:00:00');バックエンド(サーバ)のソースコード
スポンサーリンク
Entityクラスの作成
データベースから取得したデータを格納するEntityクラスを作成します。
[com.example.demo.entity.User.java]
package com.example.demo.entity;

import java.util.Date;

import javax.persistence.Column;
import javax.persistence.Entity;
import javax.persistence.GeneratedValue;
import javax.persistence.GenerationType;
import javax.persistence.Id;
import javax.persistence.Table;

import lombok.Data;

/**
 * ユーザー情報 Entity
 */
@Entity
@Data
@Table(name = "user")
public class User {

    /**
     * ID
     */
    @Id
    @Column(name = "id")
    @GeneratedValue(strategy = GenerationType.IDENTITY)
    private Long id;

    /**
     * 名前
     */
    @Column(name = "name")
    private String name;

    /**
     * 住所
     */
    @Column(name = "address")
    private String address;

    /**
     * 電話番号
     */
    @Column(name = "phone")
    private String phone;

    /**
     * 更新日時
     */
    @Column(name = "update_date")
    private Date updateDate;

    /**
     * 登録日時
     */
    @Column(name = "create_date")
    private Date createDate;

    /**
     * 削除日時
     */
    @Column(name = "delete_date")
    private Date deleteDate;
}
Repositoryクラスの作成
データベースへアクセスするためのRepositoryクラスを作成します。
[com.example.demo.repository.UserRepository.java]
package com.example.demo.repository;

import org.springframework.data.jpa.repository.JpaRepository;
import org.springframework.stereotype.Repository;

import com.example.demo.entity.User;

/**
 * ユーザー情報 Repository
 */
@Repository
public interface UserRepository extends JpaRepository<User, Long> {
}
Controllerクラスの作成
フロントエンドとバックエンドの入出力の管理を行うControllerクラスを作成します。
[com.example.demo.controller.UserController.java]
package com.example.demo.controller;

import java.util.List;

import org.springframework.beans.factory.annotation.Autowired;
import org.springframework.stereotype.Controller;
import org.springframework.ui.Model;
import org.springframework.web.bind.annotation.RequestMapping;
import org.springframework.web.bind.annotation.RequestMethod;

import com.example.demo.entity.User;
import com.example.demo.service.UserService;

/**
 * ユーザー情報 Controller
 */
@Controller
public class UserController {

  /**
   * ユーザー情報 Service
   */
  @Autowired
  UserService userService;

  /**
   * ユーザー情報一覧画面を表示
   * @param model Model
   * @return ユーザー情報一覧画面のHTML
   */
  @RequestMapping(value = "/user/list", method = RequestMethod.GET)
  public String displayList(Model model) {
    List<User> userlist = userService.searchAll();
    model.addAttribute("userlist", userlist);
    return "user/list";
  }
}
Serviceクラスの作成
具体的な処理(ビジネスロジック)を記述するServiceクラスを作成します。
[com.example.demo.service.UserService.java]
package com.example.demo.service;

import java.util.List;

import org.springframework.beans.factory.annotation.Autowired;
import org.springframework.stereotype.Service;

import com.example.demo.entity.User;
import com.example.demo.repository.UserRepository;

/**
 * ユーザー情報 Service
 */
@Service
public class UserService {

    /**
     * ユーザー情報 Repository
     */
    @Autowired
    UserRepository userRepository;

    public List<User> searchAll() {
        // ユーザーTBLの内容を全検索
        return userRepository.findAll();
    }
}
フロントエンド(画面)のソースコード
HTMLの作成
ユーザーの一覧画面をHTMLで作成します。テンプレートエンジンは「Thymeleaf」を使用しています。
[templates/user/list.html]
<!DOCTYPE html>
<html xmlns="http://www.w3.org/1999/xhtml"xmlns:th="http://www.thymeleaf.org">
<head>
<title>ユーザー情報一覧</title>
<link href="/css/list.css" rel="stylesheet"></link>
<meta charset="utf-8" />
</head>
<body>
    <h1>ユーザー情報一覧</h1>
    <table>
        <thead>
            <tr>
                <th>ID</th>
                <th>名前</th>
                <th>住所</th>
                <th>電話番号</th>
                <th>更新日時</th>
                <th>登録日時</th>
                <th>削除日時</th>
            </tr>
        </thead>
        <tbody>
            <tr th:each="user : ${userlist}" th:object="${user}">
                <td class="center" th:text="*{id}"></td>
                <td th:text="*{name}"></td>
                <td th:text="*{address}"></td>
                <td class="center" th:text="*{phone}"></td>
                <td class="center" th:text="${#dates.format(user.updateDate, 'yyyy/MM/dd')}"></td>
                <td class="center" th:text="${#dates.format(user.createDate, 'yyyy/MM/dd')}"></td>
                <td class="center" th:text="${#dates.format(user.deleteDate, 'yyyy/MM/dd')}"></td>
            </tr>
        </tbody>
    </table>
</body>
</html>
CSSの作成
HTMLで読み込むスタイルシート(CSS)を作成します。
[static/css/list.css]
table {
    width: 90%;
    border-collapse: collapse;
    font-size: 12px;
}

table th, table td {
    border: 1px solid #ddd;
    padding: 6px;
}

table th {
    background-color: #F2F2F2;
}

.center {
    text-align: center;
}
スポンサーリンク
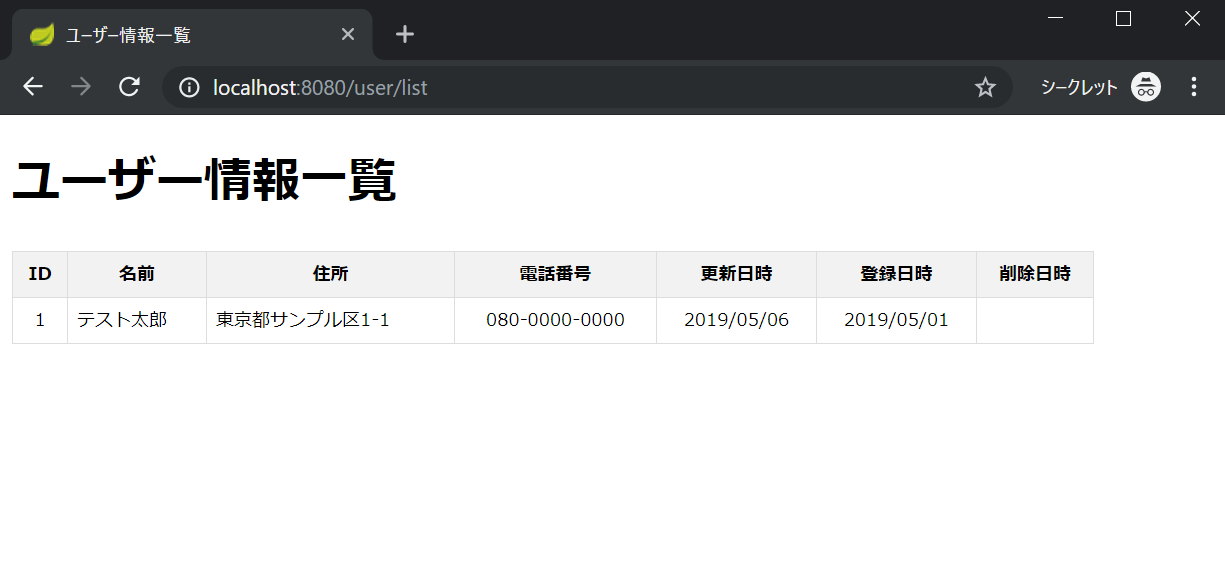
Webアプリケーションの実行
Spring Bootプロジェクトを実行して http://localhost:8080/user/list へアクセスします。
以下の画面が表示されれば、完了です。
終わりに
本記事では「Spring Boot+JPAでデータベースに接続する方法」を行う手順について紹介しました。
次回は、JPAではなくMyBatisを利用したアプリケーションの作り方を紹介します。
- 準備編 EclipseでSpring Bootの環境構築 | 分かりやすく図解で説明
- 第一章 Spring Boot+Thymeleafで”Hello World”を作成する
- 第二章 Spring Boot+JPAでデータベースに接続する方法
- 第三章 Spring Boot+MyBatisでデータベースに接続する