
目次
はじめに
Javaの人気フレームワークであるSpring Boot、そしてSpring Bootと相性の良いテンプレート・エンジンThymeleafを使用して、本記事では簡単に入力フォームをPOSTする方法を紹介します。
開発環境
開発環境は以下の通り。
| 開発環境 | 名称 | 説明 |
| 開発ツール | Eclipse | Javaでの定番開発ツール |
| フレームワーク | Spring Boot | 人気のSpringフレームワークをベースとしたフレームワーク |
| テンプレートエンジン | Thymeleaf | Spring Bootと相性が良いテンプレートエンジン |
環境構築手順はこちら ⇒ EclipseでSpring Bootの環境構築 | 分かりやすく図解で説明
ディレクトリ構成
プロジェクトのディレクトリ構造は以下の通り。
springSample
  |
  |___src.main.java
       |
       |___com.example.demo
       |    |
       |    |___controller
       |    |    |
       |    |    |__UserController.java
       |    |
       |    |___dto
       |         |
       |         |___UserRequest.java
       |
       |___src.main.resources
            |
            |___templates
            |    |
            |    |___user
            |         |
            |         |___add.html
            |
            |___static
                 |
                 |___css
                      |
                      |___add.css
プロジェクトにある「build.gradle」を開き、使用する機能と依存関係の設定を行います。
dependencies {
implementation 'org.springframework.boot:spring-boot-starter-thymeleaf'
implementation 'org.springframework.boot:spring-boot-starter-web'
compileOnly 'org.projectlombok:lombok:1.16.4'
runtimeOnly 'org.springframework.boot:spring-boot-devtools'
providedRuntime 'org.springframework.boot:spring-boot-starter-tomcat'
testImplementation 'org.springframework.boot:spring-boot-starter-test'
}
Data Transfer Objectの作成
データを格納する箱である「Data Transfer Object」を作成します。
[UserRequest.java]
package com.example.demo.dto;

import java.io.Serializable;
import lombok.Data;

/**
* ユーザー情報 リクエストデータ
*/
@Data
public class UserRequest implements Serializable {

/**
* 名前
*/
private String name;
/**
* 住所
*/
private String address;
/**
* 電話番号
*/
private String phone;
}
Lombokの@Dataを使用してgetterとsetterを書かないようにシンプルな作りにします。
※Lombokの@Dataは、getterとsetterをコンパイル時に自動生成してくれる。
Controllerの作成
フロントエンドとバックエンドの入出力の管理を行うControllerクラスを作成します。
[UserController.java]
package com.example.demo.controller;

import java.util.List;

import org.springframework.beans.factory.annotation.Autowired;
import org.springframework.stereotype.Controller;
import org.springframework.ui.Model;
import org.springframework.web.bind.annotation.ModelAttribute;
import org.springframework.web.bind.annotation.RequestMapping;
import org.springframework.web.bind.annotation.RequestMethod;

import com.example.demo.dto.UserRequest;

/**
* ユーザー情報 Controller
*/
@Controller
public class UserController {
/**
* ユーザー新規登録画面を表示
* @param model Model
* @return ユーザー情報一覧画面
*/
@RequestMapping(value = "/user/add", method = RequestMethod.GET)
public String displayAdd(Model model) {
// 入力フォームで取り扱うオブジェクトを設定
model.addAttribute("userRequest", new UserRequest());
// 表示するHTMLを指定
return "user/add";
}

/**
* ユーザー新規登録
* @param userRequest リクエストデータ
* @param model Model
* @return ユーザー情報一覧画面
*/
@RequestMapping(value="/user/create", method=RequestMethod.POST)
public String create(@ModelAttribute UserRequest userRequest, Model model) {
// userRequestに入力フォームの内容が格納されている
}
}
画面表示時に「displayAdd」メソッドが動作し、入力フォームPOST時に「create」メソッドが動作します。
スポンサーリンク
HTMLの作成
画面のHTMLを作成します。
[add.html]
<!DOCTYPE html>
<html xmlns="http://www.w3.org/1999/xhtml" xmlns:th="http://www.thymeleaf.org">
<head>
<title>ユーザー新規登録</title>
<link href="/css/add.css" rel="stylesheet"></link>
<meta charset="utf-8" />
</head>
<body>
<h1>ユーザー新規登録</h1>
<form th:action="@{/user/create}" th:object="${userRequest}" method="post">
<table>
<tr>
<th class="cell_title">名前</th>
<th class="cell_required">※</th>
<td><input type="text" th:field="*{name}"></td>
</tr>
<tr>
<th class="cell_title">住所</th>
<th class="cell_required"></th>
<td><input type="text" th:field="*{address}"></td>
</tr>
<tr>
<th class="cell_title">電話番号</th>
<th class="cell_required"></th>
<td><input type="text" th:field="*{phone}"></td>
</tr>
</table>
<div class="btn_area_center"><input type="submit" value="登録" class="btn"></div>
</form>
</body>
</html>
formタグには以下の値を設定します。
th:action:動作させるControllerの@RequestMappingのvalueと一致する値
th:object:画面表示時に動作したControlleで設定した「model.addAttribute("key", オブジェクト」のキー値
inputタグには以下の値を設定します。
th:field:formタグの「th:object」で設定したクラスのフィールドを設定
スタイルシート(CSS)の作成
[add.css]
body {
width: 80%;
}
table{
width: 100%;
border-collapse: collapse;
font-size: 13px;
}
table th, table td {
border: 1px solid #ddd;
padding: 6px;
}
table th {
background-color: #F2F2F2;
}
table input {
width:90%;
}
.cell_title {
border-right: 0;
}
.cell_required{
color: red;
font-size: 12px;
width: 10px;
border-left: 0;
}
.btn {
width: 100px;
text-align: center;
}
.btn_area_center {
margin-top: 20px;
text-align: center;
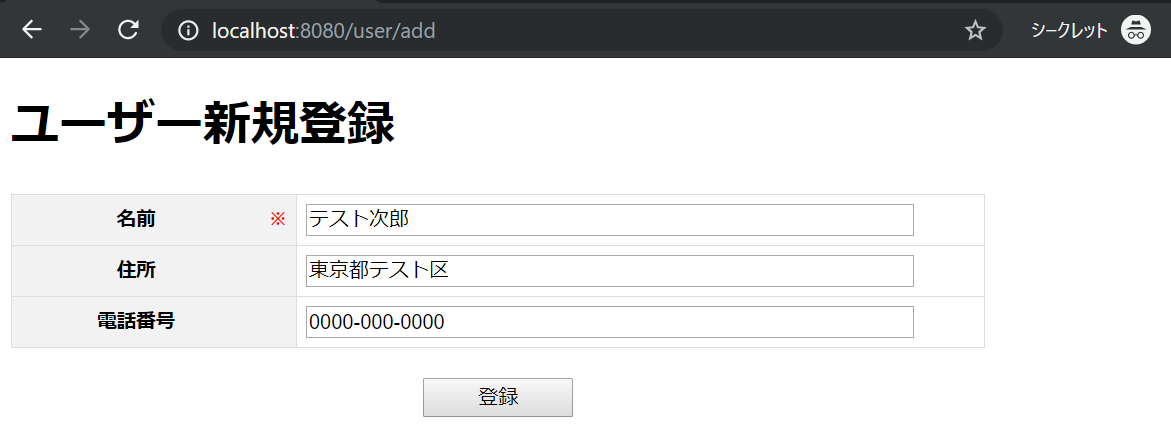
}Webアプリケーションの実行
Spring Bootプロジェクトを実行して http://localhost:8080/user/add へアクセスします。ユーザー新規登録画面が表示されるので、「名前」「住所」「電話番号」を入力して「登録」ボタンを押下すると、UserControllerクラスの「create」メソッドが動き出します。入力フォームの内容は引数「userRequest」に格納されます。