

目次
はじめに
MyBatisとSpring Bootを利用して「検索画面」「登録画面」「編集画面」の作成方法を紹介します。
本記事で作成する画面は次のとおりです。
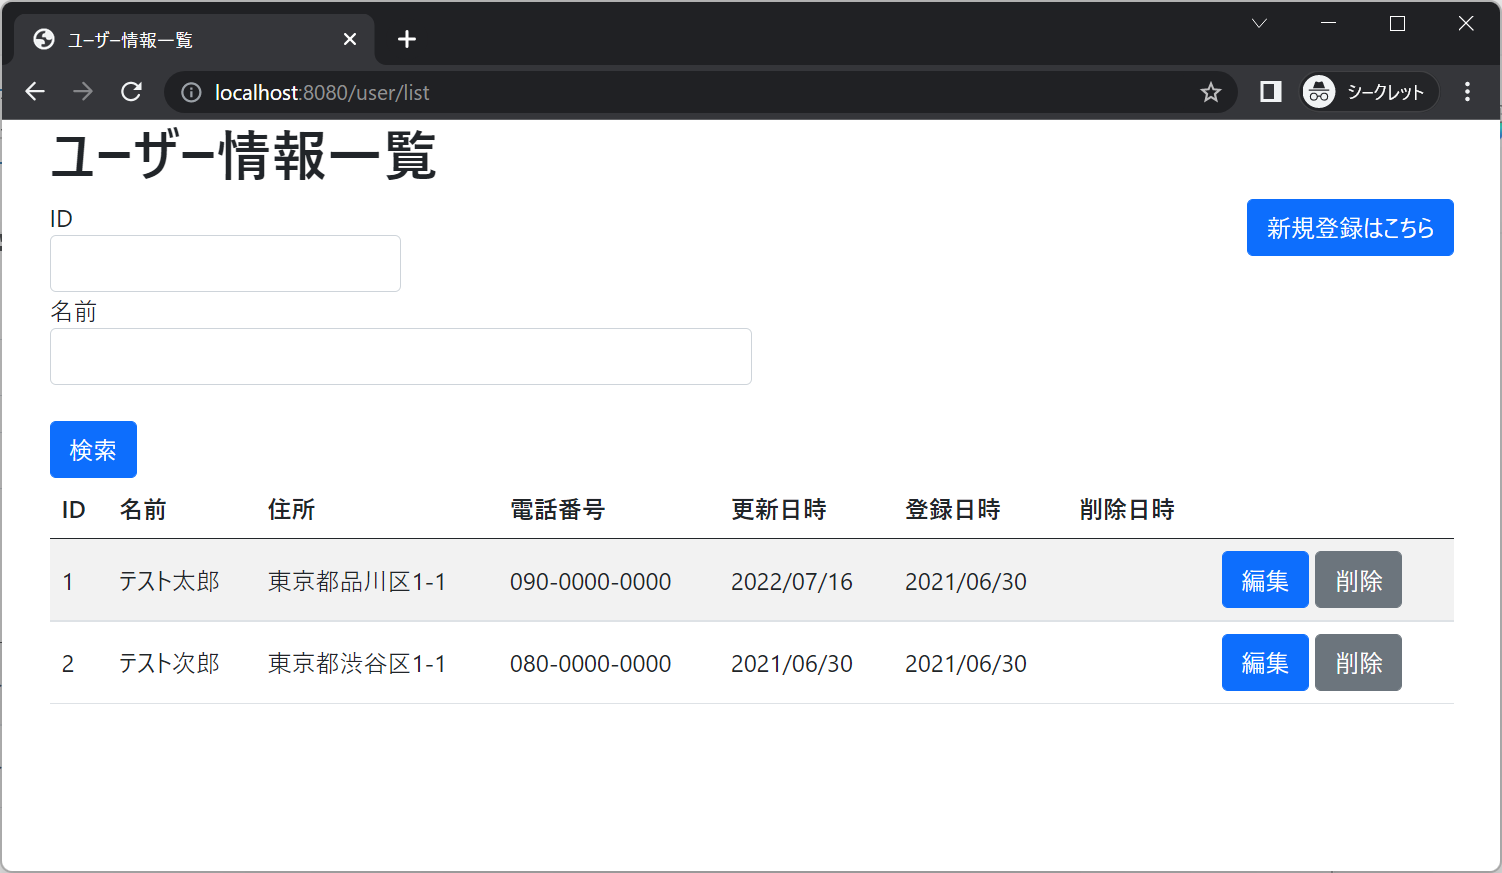
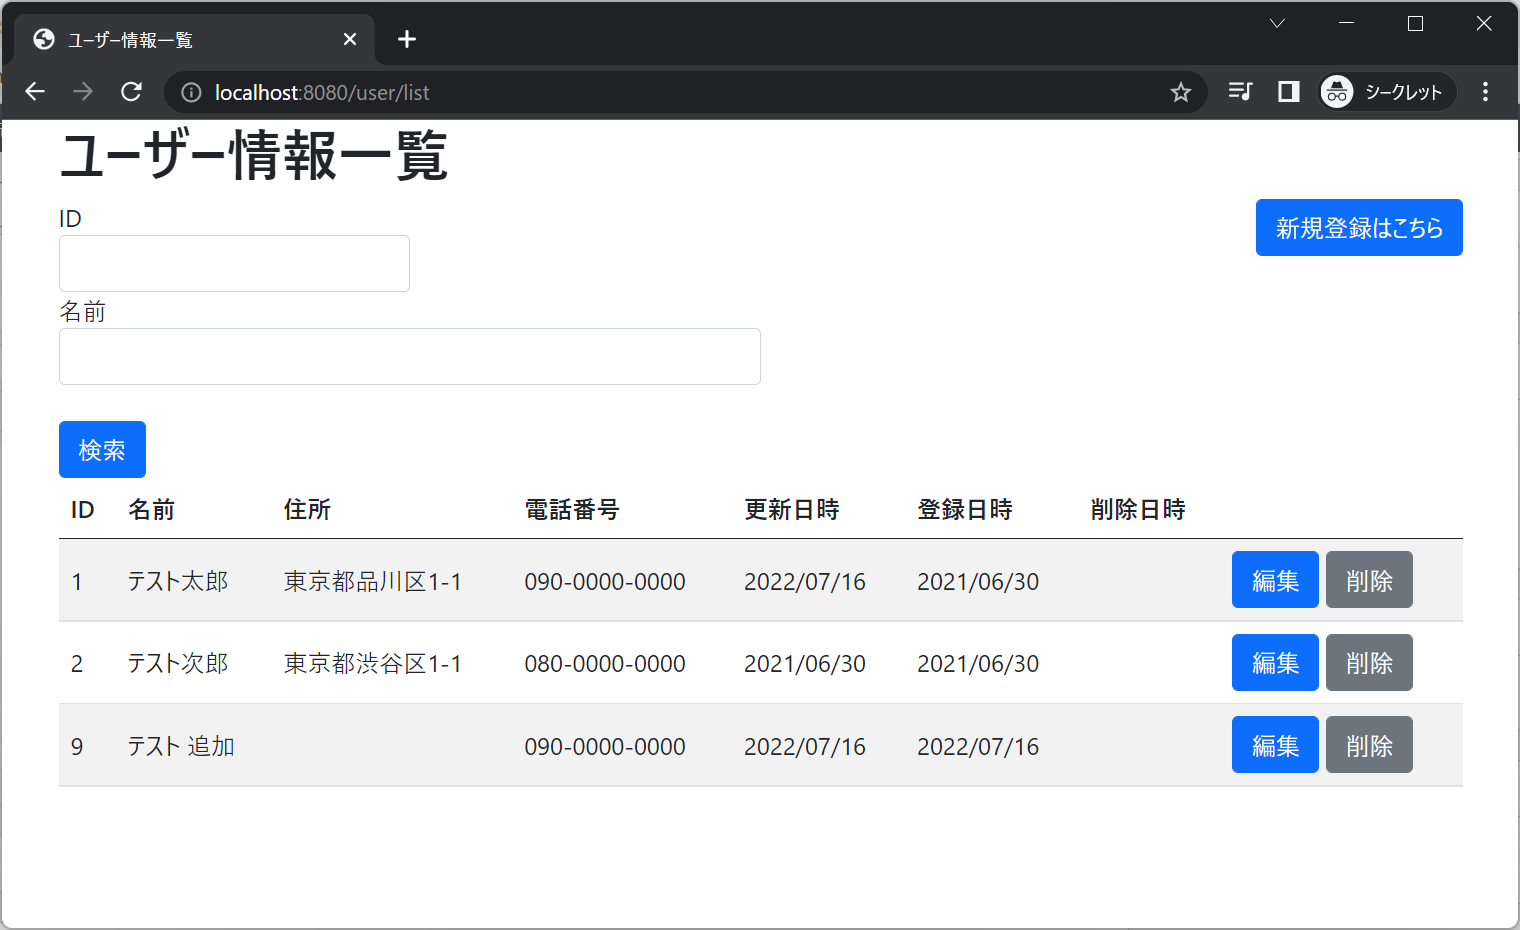
■検索画面
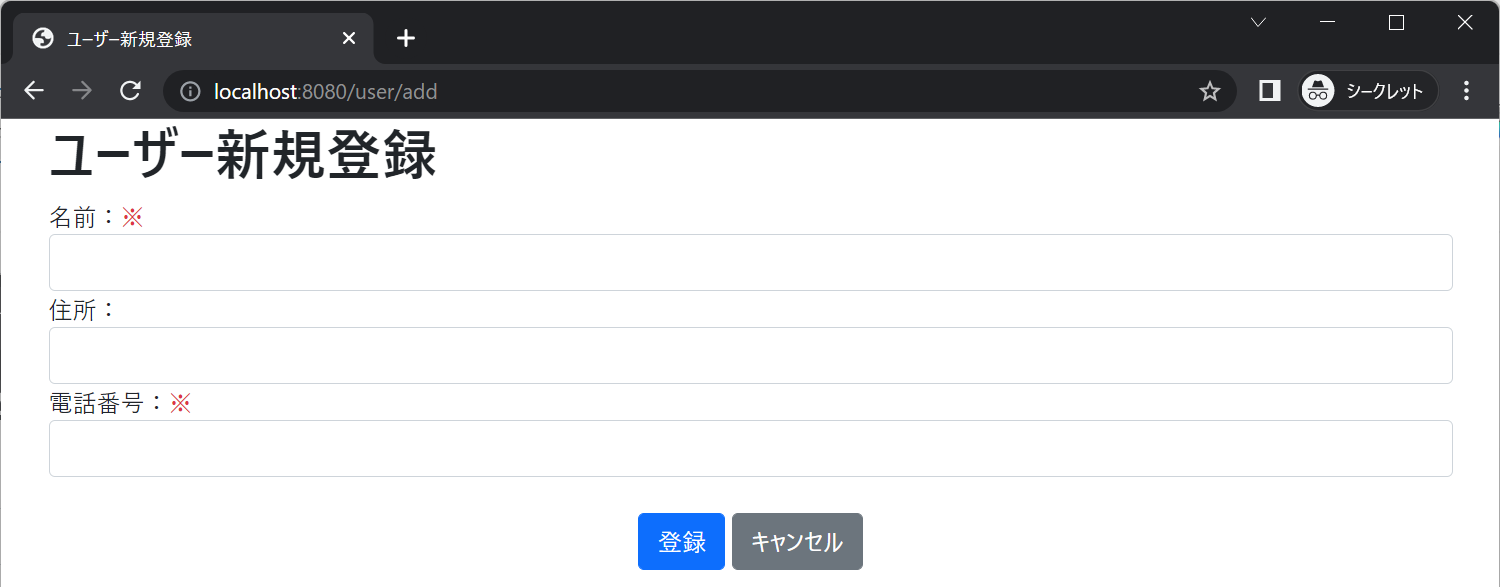
■新規登録画面
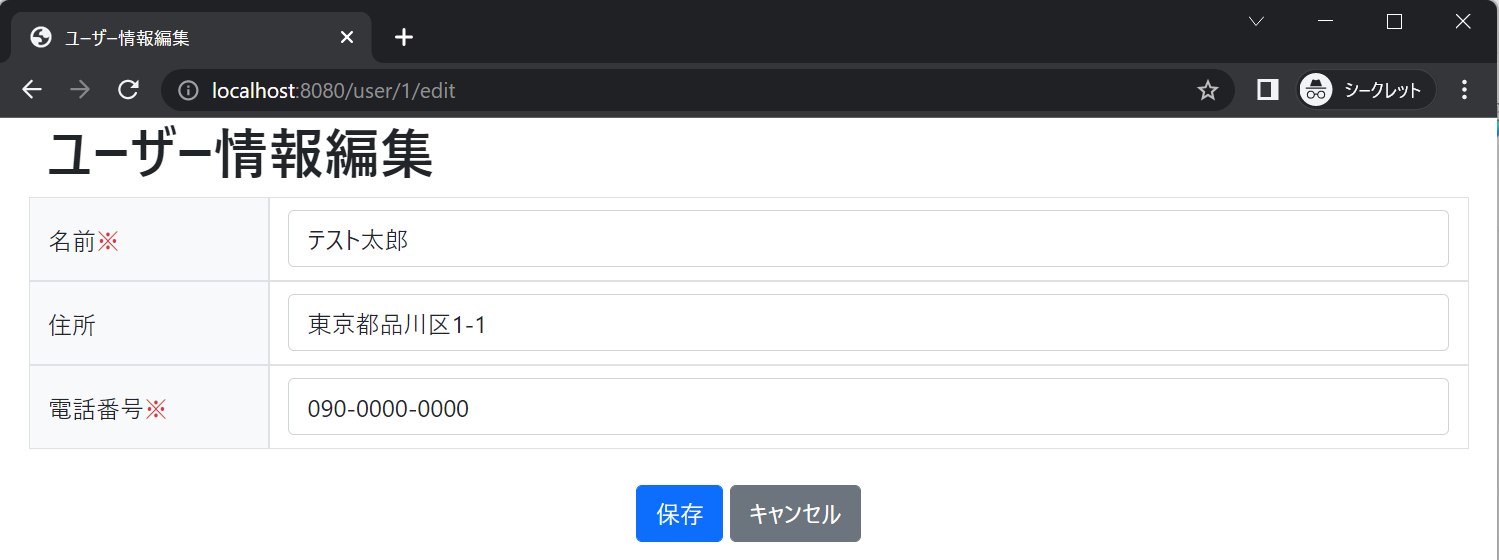
■編集画面
開発環境
| 開発環境 | 名称 | 説明 |
| 開発言語 | Java | 人気の開発言語 |
| 開発ツール | Eclipse | Javaでの定番開発ツール |
| フレームワーク | Spring Boot | 人気のSpringフレームワークをベースとしたフレームワーク |
| テンプレートエンジン | Thymeleaf | Spring Bootと相性が良いテンプレートエンジン |
| データベース | MySQL | フリーで利用できる人気データベース |
| ORM(オブジェクト関係マッピング) | MyBatis | DBとJavaオブジェクトのマッピングを行ってくれる人気のORM |
| 画面デザイン | Bootstrap | 作られた雛形を使うことで簡単にWebのデザインができるWebフレームワーク |
スポンサーリンク
本記事で使用するテーブル定義は次のとおり。
| 物理名 | 論理名 | データ型 | NOT NULL | 説明 |
| id | ID | BIGINT | 〇 | 主キー(AUTO_INCREMENT) |
| name | 名前 | VARCHAR(100) | 〇 | ユーザーの名前 |
| address | 住所 | VARCHAR(255) | ユーザーの住所 | |
| phone | 電話番号 | VARCHAR(50) | ユーザーの電話番号 | |
| update_date | 更新日時 | DATETIME | 〇 | 最終更新日時 |
| create_date | 作成日時 | DATETIME | 〇 | 登録日時 |
| delete_date | 削除日時 | DATETIME | 論理削除した日時 |
■CREATE文
CREATE TABLE `sampledb`.`userinfo` (
  `id` BIGINT NOT NULL AUTO_INCREMENT,
  `name` VARCHAR(100) NOT NULL,
  `address` VARCHAR(255) NULL,
  `phone` VARCHAR(50) NULL,
  `update_date` DATETIME NOT NULL,
  `create_date` DATETIME NOT NULL,
  `delete_date` DATETIME NULL,
  PRIMARY KEY (`id`));
ディレクトリ構成
MybatisSample
  |
  |___src.main.java
       |
       |___com.example.demo
       |    |
       |    |___controller
       |    |    |
       |    |    |__UserInfoController.java
       |    |
       |    |____dto
       |    |    |
       |    |    |__UserAddRequest.java
       |    |    |
       |    |    |__UserSearchRequest.java
       |    |    |
       |    |    |__UserUpdateRequest.java
       |    |
       |    |___entity
       |    |    |
       |    |    |___UserInfo.java
       |    |
       |    |___dao
       |    |    |
       |    |    |___UserInfoMapper.java
       |    |
       |    |___service
       |         |
       |         |___UserInfoService.java
       |
       |___src.main.resources
            |
            |___com.example.demo
            |    |
            |    |___dao
            |         |
            |         |__UserInfoMapper.xml
            |
            |___templates
            |    |
            |    |___common
            |    |    |
            |    |    |___head.html
            |    |
            |    |___user
            |         |
            |         |___add.html
            |         |
            |         |___edit.html
            |         |
            |         |___search.html
            |
            |___application.properties
設定ファイル
使用しているライブライとその依存関係は次のとおり。
■pom.xml
<dependencies>
    <dependency>
        <groupId>org.springframework.boot</groupId>
        <artifactId>spring-boot-starter-thymeleaf</artifactId>
    </dependency>
    <dependency>
        <groupId>org.springframework.boot</groupId>
        <artifactId>spring-boot-starter-web</artifactId>
    </dependency>
    <dependency>
        <groupId>org.mybatis.spring.boot</groupId>
        <artifactId>mybatis-spring-boot-starter</artifactId>
        <version>2.2.2</version>
    </dependency>

    <dependency>
        <groupId>mysql</groupId>
        <artifactId>mysql-connector-java</artifactId>
        <scope>runtime</scope>
    </dependency>
    <dependency>
        <groupId>org.projectlombok</groupId>
        <artifactId>lombok</artifactId>
        <optional>true</optional>
    </dependency>
    <dependency>
        <groupId>org.springframework.boot</groupId>
        <artifactId>spring-boot-starter-tomcat</artifactId>
        <scope>provided</scope>
    </dependency>
    <dependency>
        <groupId>org.springframework.boot</groupId>
        <artifactId>spring-boot-starter-test</artifactId>
        <scope>test</scope>
    </dependency>
    <dependency>
        <groupId>org.springframework.boot</groupId>
        <artifactId>spring-boot-starter-validation</artifactId>
    </dependency>
</dependencies>
データベースの接続情報とmybatisの設定は次のとおり。(mybatisで自動的にスネーク→キャメルに変換してくれる設定をtrueにしています)
■application.properties
spring.datasource.url=jdbc:mysql://localhost/sampledb
spring.datasource.username=root
spring.datasource.password=password
spring.datasource.driver-class-name=com.mysql.cj.jdbc.Driver
mybatis.configuration.map-underscore-to-camel-case=true
バックエンド(サーバ)側のソースコード
コントローラークラス
画面とビジネスロジックを繋ぐコントローラークラスは次のとおり。
package com.example.demo.controller;

import java.util.ArrayList;
import java.util.List;

import org.springframework.beans.factory.annotation.Autowired;
import org.springframework.stereotype.Controller;
import org.springframework.ui.Model;
import org.springframework.validation.BindingResult;
import org.springframework.validation.ObjectError;
import org.springframework.validation.annotation.Validated;
import org.springframework.web.bind.annotation.GetMapping;
import org.springframework.web.bind.annotation.ModelAttribute;
import org.springframework.web.bind.annotation.PathVariable;
import org.springframework.web.bind.annotation.RequestMapping;
import org.springframework.web.bind.annotation.RequestMethod;

import com.example.demo.dto.UserAddRequest;
import com.example.demo.dto.UserSearchRequest;
import com.example.demo.dto.UserUpdateRequest;
import com.example.demo.entity.UserInfo;
import com.example.demo.service.UserInfoService;

/**
 * ユーザー情報 Controller
 */
@Controller
public class UserInfoController {

    /**
     * ユーザー情報 Service
     */
    @Autowired
    private UserInfoService userInfoService;

    /**
     * ユーザー情報一覧画面を表示
     * @param model Model
     * @return ユーザー情報一覧画面
     */
    @GetMapping(value = "/user/list")
    public String displayList(Model model) {
        List<UserInfo> userList = userInfoService.findAll();
        model.addAttribute("userlist", userList);
        model.addAttribute("userSearchRequest", new UserSearchRequest());
        return "user/search";
    }

    /**
     * ユーザー新規登録画面を表示
     * @param model Model
     * @return ユーザー情報一覧画面
     */
    @GetMapping(value = "/user/add")
    public String displayAdd(Model model) {
        model.addAttribute("userAddRequest", new UserAddRequest());
        return "user/add";
    }

    /**
     * ユーザー編集画面を表示
     * @param id ユーザーID
     * @param model Model
     * @return ユーザー編集画面
     */
    @GetMapping("/user/{id}/edit")
    public String displayEdit(@PathVariable Long id, Model model) {
        UserInfo user = userInfoService.findById(id);
        UserUpdateRequest userUpdateRequest = new UserUpdateRequest();
        userUpdateRequest.setId(user.getId());
        userUpdateRequest.setId(user.getId());
        userUpdateRequest.setName(user.getName());
        userUpdateRequest.setPhone(user.getPhone());
        userUpdateRequest.setAddress(user.getAddress());
        model.addAttribute("userUpdateRequest", userUpdateRequest);
        return "user/edit";
    }

    /**
     * ユーザー情報検索
     * @param userSearchRequest リクエストデータ
     * @param model Model
     * @return ユーザー情報一覧画面
     */
    @RequestMapping(value = "/user/search", method = RequestMethod.POST)
    public String search(@ModelAttribute UserSearchRequest userSearchRequest, Model model) {
        List<UserInfo> userList = userInfoService.search(userSearchRequest);
        model.addAttribute("userlist", userList);
        return "user/search";
    }

    /**
     * ユーザー情報削除(論理削除)
     * @param id ユーザーID
     * @param model Model
     * @return ユーザー情報一覧画面
     */
    @GetMapping("/user/{id}/delete")
    public String delete(@PathVariable Long id, Model model) {
        // ユーザー情報の削除
        userInfoService.delete(id);
        return "redirect:/user/list";
    }

    /**
     * ユーザー新規登録
     * @param userRequest リクエストデータ
     * @param model Model
     * @return ユーザー情報一覧画面
     */
    @RequestMapping(value = "/user/create", method = RequestMethod.POST)
    public String create(@Validated @ModelAttribute UserAddRequest userRequest, BindingResult result, Model model) {
        if (result.hasErrors()) {
            // 入力チェックエラーの場合
            List<String> errorList = new ArrayList<String>();
            for (ObjectError error : result.getAllErrors()) {
                errorList.add(error.getDefaultMessage());
            }
            model.addAttribute("validationError", errorList);
            return "user/add";
        }
        // ユーザー情報の登録
        userInfoService.save(userRequest);
        return "redirect:/user/list";
    }

    /**
     * ユーザー更新
     * @param userRequest リクエストデータ
     * @param model Model
     * @return ユーザー情報詳細画面
     */
    @RequestMapping(value = "/user/update", method = RequestMethod.POST)
    public String update(@Validated @ModelAttribute UserUpdateRequest userUpdateRequest, BindingResult result, Model model) {
        if (result.hasErrors()) {
            List<String> errorList = new ArrayList<String>();
            for (ObjectError error : result.getAllErrors()) {
                errorList.add(error.getDefaultMessage());
            }
            model.addAttribute("validationError", errorList);
            return "user/edit";
        }
        // ユーザー情報の更新
        userInfoService.update(userUpdateRequest);
        return "redirect:/user/list";
    }
}
サービスクラス
ビジネスロジックを記述するサービスクラスは次のとおり。
[com.example.demo.service.UserInfoService.java]
package com.example.demo.service;

import java.util.List;

import org.springframework.beans.factory.annotation.Autowired;
import org.springframework.stereotype.Service;

import com.example.demo.dao.UserInfoMapper;
import com.example.demo.dto.UserAddRequest;
import com.example.demo.dto.UserSearchRequest;
import com.example.demo.dto.UserUpdateRequest;
import com.example.demo.entity.UserInfo;

/**
 * ユーザー情報 Service
 */
@Service
public class UserInfoService {

    /**
     * ユーザー情報 Mapper
     */
    @Autowired
    private UserInfoMapper userInfoMapper;

    /**
     * ユーザー情報全件検索
     * @return 検索結果
     */
    public List<UserInfo> findAll() {
        return userInfoMapper.findAll();
    }

    /**
     * ユーザー情報主キー検索
     * @return 検索結果
     */
    public UserInfo findById(Long id) {
        return userInfoMapper.findById(id);
    }

    /**
     * ユーザー情報検索
     * @param userSearchRequest リクエストデータ
     * @return 検索結果
     */
    public List<UserInfo> search(UserSearchRequest userSearchRequest) {
        return userInfoMapper.search(userSearchRequest);
    }

    /**
     * ユーザ情報登録
     * @param userAddRequest リクエストデータ
     */
    public void save(UserAddRequest userAddRequest) {
        userInfoMapper.save(userAddRequest);
    }

    /**
     * ユーザ情報更新
     * @param userEditRequest リクエストデータ
     */
    public void update(UserUpdateRequest userUpdateRequest) {
        userInfoMapper.update(userUpdateRequest);
    }

    /**
     * ユーザー情報論理削除
     * @param id
     */
    public void delete(Long id) {
        userInfoMapper.delete(id);
    }
}
エンティティクラス
テーブルのエンティティクラスは次のとおり。
[com.example.demo.entity.UserInfo.java]
package com.example.demo.entity;

import java.io.Serializable;
import java.util.Date;

import lombok.Data;

/**
 * ユーザー情報 Entity
 */
@Data
public class UserInfo implements Serializable {

    /**
     * ID
     */
    private Long id;

    /**
     * 名前
     */
    private String name;

    /**
     * 住所
     */
    private String address;

    /**
     * 電話番号
     */
    private String phone;

    /**
     * 更新日時
     */
    private Date updateDate;

    /**
     * 登録日時
     */
    private Date createDate;

    /**
     * 削除日時
     */
    private Date deleteDate;
}
DAO(Data Access Object)
SQL文を呼び出すためのDAOクラスは以下のとおり。
[com.example.demo.dao.UserInfoMapper.java]
package com.example.demo.dao;

import java.util.List;

import org.apache.ibatis.annotations.Mapper;

import com.example.demo.dto.UserAddRequest;
import com.example.demo.dto.UserSearchRequest;
import com.example.demo.dto.UserUpdateRequest;
import com.example.demo.entity.UserInfo;

/**
 * ユーザー情報 Mapper
 */
@Mapper
public interface UserInfoMapper {

    /**
     * ユーザー情報全件検索
     * @param user 検索用リクエストデータ
     * @return 検索結果
     */
    List<UserInfo> findAll();

    /**
     * ユーザー情報主キー検索
     * @param id 主キー
     * @return 検索結果
     */
    UserInfo findById(Long id);

    /**
     * ユーザー情報検索
     * @param user 検索用リクエストデータ
     * @return 検索結果
     */
    List<UserInfo> search(UserSearchRequest user);

    /**
     * ユーザー情報登録
     * @param userRequest 登録用リクエストデータ
     */
    void save(UserAddRequest userRequest);

    /**
     * ユーザー情報更新
     * @param userUpdateRequest 更新用リクエストデータ
     */
    void update(UserUpdateRequest userUpdateRequest);

    /**
     * ユーザー情報の論理削除
     * @param id ID
     */
    void delete(Long id);
}
SQL文(XMLファイル)
実行するSQL文は次のとおり。
[resources.com.example.demo.dao.UserInfoMapper.xml]
<?xml version="1.0" encoding="UTF-8" ?>
<!DOCTYPE mapper
        PUBLIC "-//mybatis.org//DTD Mapper 3.0//EN"
        "http://mybatis.org/dtd/mybatis-3-mapper.dtd">
<mapper namespace="com.example.demo.dao.UserInfoMapper">

    <!-- 全件検索 -->
    <select id="findAll" resultType="com.example.demo.entity.UserInfo">
        SELECT * FROM userinfo WHERE delete_date IS NULL
    </select>

    <!-- 主キー検索 -->
    <select id="findById" resultType="com.example.demo.entity.UserInfo">
        SELECT * FROM userinfo WHERE id=#{id} AND delete_date IS NULL
    </select>

    <!-- 条件指定検索 -->
    <select id="search" resultType="com.example.demo.entity.UserInfo">
        SELECT
            *
        FROM
            userinfo
        WHERE
            delete_date IS NULL
            <if test="id != null and id != ''">
                AND id = #{id}
            </if>
            <if test="name != null and name != ''">
                AND name LIKE CONCAT('%', #{name}, '%')
            </if>
    </select>

    <!-- 新規登録 -->
    <insert id="save">
        INSERT INTO userInfo
            (name, address, phone, update_date, create_date)
        VALUES
            (#{name}, #{address}, #{phone}, CURRENT_TIMESTAMP,  CURRENT_TIMESTAMP)
    </insert>

    <!-- 更新 -->
    <update id="update">
        UPDATE userinfo SET name = #{name}, address = #{address}, phone = #{phone}, update_date = CURRENT_TIMESTAMP WHERE id = #{id}
    </update>

    <!-- 論理削除 -->
    <update id="delete">
        UPDATE userinfo SET delete_date = CURRENT_TIMESTAMP WHERE id = #{id}
    </update>
</mapper>XMLファイルは、src/main/resources配下にUserInfoMapperクラス(Mapperインタフェース)と同じパスの構成で配置します。同じパスで配置することで、MyBatisが自動でマッピングファイルを読み込んでくれます。
同じパスではなく自由な場所に配置したい場合は、「yaml」もしくは「properties」に「mybatis.mapper-locations」でXMLファイルの格納位置を指定します。
mybatis.mapper-locations=classpath*:sample/*.xmlDTO(Data Transfer Object)
データの受け渡しで利用するDTOクラスは次のとおり。
[com.example.demo.dto.UserAddRequest]
package com.example.demo.dto;

import java.io.Serializable;

import javax.validation.constraints.NotEmpty;
import javax.validation.constraints.Pattern;
import javax.validation.constraints.Size;

import lombok.Data;

/**
 * ユーザー情報登録 リクエストデータ
 */
@Data
public class UserAddRequest implements Serializable {
    /**
     * 名前
     */
    @NotEmpty(message = "名前を入力してください")
    @Size(max = 100, message = "名前は100桁以内で入力してください")
    private String name;
    /**
     * 住所
     */
    @Size(max = 255, message = "住所は255桁以内で入力してください")
    private String address;
    /**
     * 電話番号
     */
    @Pattern(regexp = "0\\d{1,4}-\\d{1,4}-\\d{4}", message = "電話番号の形式で入力してください")
    private String phone;
}
[com.example.demo.dto.UserSearchRequest]
package com.example.demo.dto;

import java.io.Serializable;

import lombok.Data;

/**
 * ユーザー情報 検索用リクエストデータ
 */
@Data
public class UserSearchRequest implements Serializable {

    /**
     * ユーザーID
     */
    private String id;

    /**
     * ユーザー名
     */
    private String name;
}
[com.example.demo.dto.UserUpdateRequest]
package com.example.demo.dto;

import java.io.Serializable;

import javax.validation.constraints.NotNull;

import lombok.Data;
import lombok.EqualsAndHashCode;

/**
 * ユーザー情報更新リクエストデータ
 *
 */
@Data
@EqualsAndHashCode(callSuper = false)
public class UserUpdateRequest extends UserAddRequest implements Serializable {

    /**
     * ユーザーID
     */
    @NotNull
    private Long id;
}
スポンサーリンク
フロントエンド(クライアント)側のソースコード
共通ヘッダ(head.html)
共通のヘッダは次のとおり。ヘッダ情報は同じなので共通で管理しています。
[templates.common.head.html]
<head th:fragment="head_fragment(title, scripts, links)">
  <title th:text="${title}"></title>
  <link href="https://cdn.jsdelivr.net/npm/bootstrap@5.0.2/dist/css/bootstrap.min.css" rel="stylesheet" integrity="sha384-EVSTQN3/azprG1Anm3QDgpJLIm9Nao0Yz1ztcQTwFspd3yD65VohhpuuCOmLASjC" crossorigin="anonymous">
  <script src="https://cdn.jsdelivr.net/npm/bootstrap@5.0.2/dist/js/bootstrap.bundle.min.js" integrity="sha384-MrcW6ZMFYlzcLA8Nl+NtUVF0sA7MsXsP1UyJoMp4YLEuNSfAP+JcXn/tWtIaxVXM" crossorigin="anonymous"></script>
  <meta charset="utf-8" />
</head>
ユーザー情報一覧画面(search.html)
ユーザー情報一覧画面のHTMLは次のとおり。
[templates.user.search.html]
<!DOCTYPE html>
<html xmlns="http://www.w3.org/1999/xhtml" xmlns:th="http://www.thymeleaf.org">
<head th:replace="common/head :: head_fragment(title = 'ユーザー情報一覧', scripts = ~{::script}, links = ~{::link})"></head>
<body>
    <div class="container">
        <h1>ユーザー情報一覧</h1>
        <div class="float-end">
            <a th:href="@{/user/add}" class="btn btn-primary">新規登録はこちら</a>
        </div>
        <form th:action="@{/user/search}" th:object="${userSearchRequest}" th:method="post">
            <div class="form-group">
                <label for="id">ID</label>
                <input type="text" class="w-25 form-control" th:field="*{id}">
                <label for="name">名前</label>
                <input type="text" class="w-50 form-control" th:field="*{name}">
            </div><br />
            <button type="submit" class="btn btn-primary">検索</button>
        </form>
        <div th:if="${userlist}">
            <table class="table table-striped">
                <thead>
                    <tr>
                        <th>ID</th>
                        <th>名前</th>
                        <th>住所</th>
                        <th>電話番号</th>
                        <th>更新日時</th>
                        <th>登録日時</th>
                        <th>削除日時</th>
                        <th></th>
                    </tr>
                </thead>
                <tbody>
                    <tr th:each="user : ${userlist}" th:object="${user}" class="align-middle">
                        <td th:text="*{id}"></td>
                        <td th:text="*{name}"></td>
                        <td th:text="*{address}"></td>
                        <td th:text="*{phone}"></td>
                        <td th:text="${#dates.format(user.updateDate, 'yyyy/MM/dd')}"></td>
                        <td th:text="${#dates.format(user.createDate, 'yyyy/MM/dd')}"></td>
                        <td th:text="${#dates.format(user.deleteDate, 'yyyy/MM/dd')}"></td>
                        <td>
                            <a th:href="@{/user/{id}/edit(id=*{id})}" class="btn btn-primary">編集</a>
                            <a th:href="@{/user/{id}/delete(id=*{id})}" class="btn btn-secondary">削除</a>
                        </td>
                    </tr>
                </tbody>
            </table>
        </div>
    </div>
</body>
</html>
ユーザー新規登録画面(add.html)
ユーザー新規登録画面のHTMLは次のとおり。
[templates.user.add.html]
<!DOCTYPE html>
<html xmlns="http://www.w3.org/1999/xhtml" xmlns:th="http://www.thymeleaf.org">
<head th:replace="common/head :: head_fragment(title = 'ユーザー新規登録', scripts = ~{::script}, links = ~{::link})"></head>
<body>
    <div class="container">
        <div th:if="${validationError}" th:each="error : ${validationError}">
            <label class="text-danger" th:text="${error}"></label>
        </div>
        <h1>ユーザー新規登録</h1>
        <form th:action="@{/user/create}" th:object="${userAddRequest}" th:method="post">
            <div class="form-group">
                <label>名前:<span class="text-danger">※</span></label>
                <input type="text" th:field="*{name}" class="form-control">
            </div>
            <div class="form-group">
                <label>住所:</label>
                <input type="text" th:field="*{address}" class="form-control">
            </div>
            <div class="form-group">
                <label>電話番号:<span class="text-danger">※</span></label>
                <input type="text" th:field="*{phone}" class="form-control">
            </div>
            <br />
            <div class="text-center">
                <input type="submit" value="登録" class="btn btn-primary">
                <a href="/user/list" class="btn btn-secondary">キャンセル</a>
            </div>
        </form>
    </div>
</body>
</html>
ユーザー情報編集(edit.html)
ユーザー情報編集画面のHTMLは次のとおり。
[templates.user.edit.html]
<!DOCTYPE html>
<html xmlns="http://www.w3.org/1999/xhtml" xmlns:th="http://www.thymeleaf.org">
<head
    th:replace="common/head :: head_fragment(title = 'ユーザー情報編集', scripts = ~{::script}, links = ~{::link})"></head>
<body>
    <div class="container">
        <div th:if="${validationError}" th:each="error : ${validationError}">
            <label class="text-danger" th:text="${error}"></label>
        </div>
        <h1>ユーザー情報編集</h1>
        <form th:action="@{/user/update}" th:object="${userUpdateRequest}"
            th:method="post">
            <input type="hidden" th:field="*{id}" />
            <div>
                <div class="row mx-md-n5">
                    <div class="col-2 pt-3 border bg-light">
                        名前<span class="text-danger">※</span>
                    </div>
                    <div class="col py-2 border">
                        <input type="text" class="form-control" th:field="*{name}">
                    </div>
                </div>
                <div class="row mx-md-n5">
                    <div class="col-2 pt-3 border bg-light">住所</div>
                    <div class="col py-2 border">
                        <input type="text" class="form-control" th:field="*{address}">
                    </div>
                </div>
                <div class="row mx-md-n5">
                    <div class="col-2 pt-3 border bg-light">
                        電話番号<span class="text-danger">※</span>
                    </div>
                    <div class="col py-2 border">
                        <input type="text" class="form-control" th:field="*{phone}">
                    </div>
                </div>
            </div>
            <br />
            <div class="text-center">
                <input type="submit" class="btn btn-primary" value="保存">
                <a href="/user/list" class="btn btn-secondary">キャンセル</a>
            </div>
        </form>
    </div>
</body>
</html>
スポンサーリンク
動作確認
Spring Bootプロジェクトを起動して「http://localhost:8080/user/list」にアクセスします。
一覧画面が表示されればOKです。
「新規登録」ボタンを押下すると「ユーザー新規登録画面」に遷移。
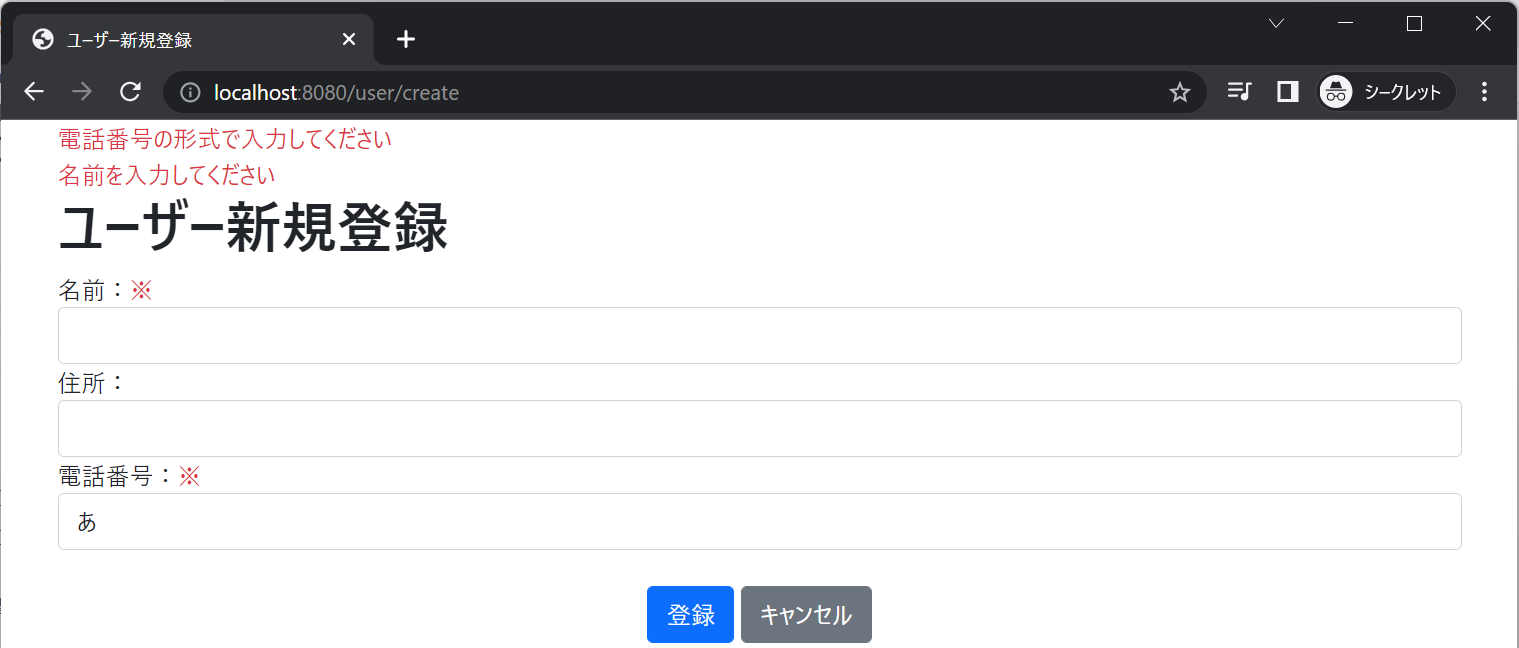
登録画面では入力チェックを実行しているため「登録」ボタン押下時に入力チェックエラーの場合は、画面上部にエラーメッセージを表示しています。
ユーザー情報を入力して「登録」ボタンを押下すると、ユーザー情報を登録し一覧画面に戻ります。
検索結果一覧にある「削除」ボタンを押下するとユーザー情報を論理削除、「編集」ボタンを押下すると「ユーザー情報編集画面」に遷移します。
「保存」ボタンを押下すると、ユーザー情報を更新し一覧画面に戻ります。